Tuesday, October 4, 2016

Art Prints Now For Sale!


After months of trying to get these ready for selling, my limited edition prints are now for sale in my Etsy shop. I will be only printing 30 of each. You can find them if you click on the small images to the right. Each print is signed and numbered by me and includes a signed and numbered certificate of authenticity.

Thursday, April 21, 2016

Embossing Folder Storage Using the Fuse Tool


Here is a video I created showing how you can store multiple embossing folders using one 12"x 12" page protector for the base and a few others for pockets using the Fuse Tool. If you are like me you get a little carried away with buying these wonderful things and run out of storage space for them. You can fit up to 24 folders on one page protector! Also use this method to get those thin dies in order along with stencils. Larger stencils can fit in the center pocket!

Friday, April 8, 2016

This is what happens when I use awesome supplies!

This week I created a layout for the Prairie Chicks Scrapbook challenge using papers from Kaisercrafts #me Collection. I don't normally like creating layouts about myself but my kids have banned me from posting layouts with them in it ( I do sneak the occasional one in there though, wink, wink). I could scrapbook about my cats but I risk being labeled that "crazy cat lady". They are so darn cute though. Two of them will have kittens this spring which we all look forward to.

Back to my layout, I started with a white piece of cardstock and used Ranger Texture Paste with a chicken wire stencil randomly adding the paste around my page. Next I found Glimmer Mist in colors that reflected the colors in the paper and splattered them on my page. I then mixed the mist with water and brushed across my paper in places. Using a circle cutter I cut a 6" circle, distressed the edges and adhered it to the page.
I tore bits from the pattern paper, curled some of the edges and layered the on the sides as well as using the ruler border strip from the edge of one of the papers. The flowers were punched out of the various pattern papers in the collection and then scrunched up to look more dimensional. A pearl brad was placed in each center. Along with sayings from the paper and the wood flourishes I just continued to layer until I came to the look I wanted.


Saturday, March 26, 2016

Would You Say This Is Dreary or Contemplative?

Recently I had the opportunity to dig out my paint and brushes and create some new paintings. It's funny that I let it go so long between sessions as once I get started I realize how much I enjoy it. Although sometimes what I want to paint and what actually gets put on the canvas can be two very different things. I can get frustrated that it's not turning out the way I want it to. The beauty of creating a finished piece of work is that no one knows what I wanted to accomplish so it all turns out good in the end. I've learned to live with this and move on for the most part.

Here are the two paintings I did last weekend. They are both untitled as of right now because that is not my area of expertise. If you can think of some creative titles for these two paintings let me know in the comments please and I will pick out my favorites!


12"x 12" Acrylic on stretched canvas


This one is only 4"x 5" big, just a bit bigger than my cell phone. Tiny paintings are fun to do, although I think it took longer to do than the bigger one, I'm not sure.

4"x 5" Acrylic on canvas board 

Compared to my cell phone.

Saturday, March 19, 2016

Where Have I put My Flowers? Check This Out!

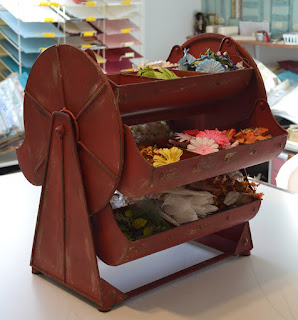
Just before Christmas I scored this really cool item from a local shop called Patina Floor and Decor in Warman, SK, Canada. They have some pretty unique items in their shop. At first I used this rotating bin for our Christmas candies, lining each bin with parchment paper to keep it clean. My original goal for this though was to store my paper crafting flowers. Although I really don't have room in my space for it I found a way to make it work because who could not want this in their craft room right?


Saturday, February 6, 2016

Tags of 2016 Feb

Here is February's tag/card that I made following along with Tim Holtz' 12 tags of 2016. This time I've decided to create a card using the remix techniques.

Saturday, January 2, 2016

Tags of 2016

Happy New Year!

What better way to start the year than with some creativity. When I saw Tim Holtz post about a new year of tags I made the decision to get on that train, use supplies I have on hand, and follow along. I did do some of the Christmas tags a few years ago and thoroughly enjoyed them. So here is the tag I made for January. 


~Jen~