Wednesday, March 27, 2013

New Albums and A Tutorial In My Etsy Store

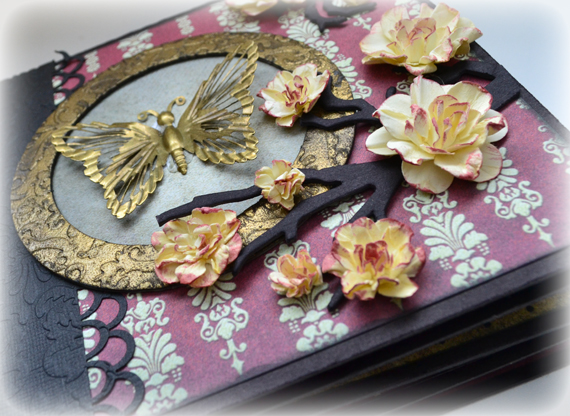
For the last month and a half I have been working on some mini albums and as I was making them I thought I would try and make a tutorial in PDF form to sell in my Etsy store as well. I'm really happy how it turned out.


These are the albums for sale

Butterfly Mini Album


Blossoms Mini Album


Blue Rose Mini Album


This is the tutorial that's for sale as well. You can make all kinds variations of these albums (as seen above and the video below) using this tutorial by changing the paper, embellishments, using dies and punches to get different looks. The tutorial is $7.00 CAD and will be emailed to you after purchase.


Watch the video below to see more :)


Monday, February 25, 2013

Storage Solution-Embossing Folders


Over the years I have collected quite a few embossing folders and gone through changes as to how I store them. This is my current storage. Hope it helps :)


Wednesday, February 20, 2013

Project Life First Week

At the beginning of January I had wanted to start a Project Life album for 2013. My format was going to be taking a couple of pictures a week to highlight that week and each week would get one page in my album. I didn't realize what a challenge this would be. It's so easy to just let life carry on and I found it difficult to remember to take pictures every week. Also I'm now trying to back track and remember what the reason behind certain photos were. I'm finding that difficult. I'm sure that it is a learning curve that I'll get better with as time goes on and be able to record things as I take the pictures and be more organized.

So today I stopped procrastinating and dug into the photos I had for week one. Other than trying to figure out what sizes I should print my photos I can definitely see why this method of scrapbooking is rising in popularity. It is really fun and could be potentially really easy (because I'm a beginner I'm still trying to figure things out and hopefully will find it easier as I go).

Another thing that's great about scrapbooking this way is it works through my paper stash (I'm determined NOT to buy more stuff for this) and uses my scraps! Because your working with smaller layouts within a large one you can cut your scraps to fit the pockets plus make journaling tags, little flag banners, and all kinds of little embellishments out of the smaller pieces.

Here is my Week 1- Jan 1-6. (sorry for the glare)


I'm using We R Memory Keepers divided page protectors. This one has a pocket that is 4"x 12" and (4) 4"x6" pockets. I printed my pictures just under 2"x3" so I could fit quite a few on this layout. I also printed a couple of thumbnail size photos. The paper was from my stash (yay!) Andrea Victoria by My Mind's Eye. I had bought a paper pack that had some die cuts with it. I plan to use this paper as far as it will go. The alpha stickers are Lily Bee designs. I cut the 2013 numbers with my electronic die cut machine.

Tuesday, February 19, 2013

Craft Room Reveal....finally!

Well I finally got it done (at least as far as I'm going to right now). After starting to paint in the beginning of January till now the room is finally ready to show. There are a few things that I still find cluttered and an eye sore but those things will have to wait a little longer. I want to get back to crafting so I am declaring it done!


Here is a video tour of the room broken down into the areas I have for each hobby and it's supplies


Part 1


Part 2


Friday, February 15, 2013

What Am I Doing Today?

After trying once to film a video tour of my craft room I decided I didn't like the way my magazines were looking on the shelf. I had many magazine file holders but they were all mismatched and still looked messy and cluttered to me so this is the project I'm tackling today. I'm covering the existing Staples file holders with fabric and then I will use one as a template and make a few more to hold all the books and magazines. Kind of daunting but the two I finished look great!


Wednesday, January 23, 2013

New Quilt in the Works

This is the project I started today. Love this fabric! Cosmopolitan by Northcott. I got all my pieces cut and you'll just have to stay tuned as to what quilt this will become ;)


Girly Valentine's Card- Tutorial

It feels good to get back to crafting in my craft room  although I will miss the fantastic large window views I had in the living room especially now that the deer have been walking across our yard almost every day. I'll also miss watching sunrises and sunsets while I craft.

 Anyways here is another Valentine's Day card I made. This year I am trying to challenge myself to use what I have and not run out and buy what I think I need. For the paper I dug really deep into my stash and found three different pink papers, two of which I think are from the very first paper I ever bought over 12 years ago. Also a while ago I made myself these cute supply challenge sticks with a punched scallop circle on top where I wrote different paper company names or general color way, embellishment categories, and technique mediums. So I randomly picked an embellishment stick and a technique stick ( I knew I wanted my paper to be pink and from old stash so I didn't pick a paper one) and came up with using my Stampin' wheel (which I hadn't used in years from Stampin' Up)  and die cuts. I did use some other things as well such as ribbon, lace, other stamps and embossing powder.


For the first step I cut my pink paper (the plainest) to 4"x 5.25", inked up my wheel with Versamark then starting on one side I rolled the wheel across my paper then trying to get as close to my stamping as possible rolled the wheel across again to cover the whole paper with pattern.


I used Ranger's Puffs white embossing powder to give a slightly raised design and then heat it with my heat tool. It's really cool because it puffs up as you heat it. 


While I still had my embossing powder out I stamped a doily image (My Mind's Eye "the Sweetest Thing" stamp set) onto a gingham pattern paper and cut it out around the edges. The Puffs embossing powder really gives the look and feel of real lace.


Next I adhered my background paper to my card base (5.5"x 8.5" scored @ 4.25 and folded).


I cut a off white piece of cardstock with a Spellbinder's die (Lattice Rectangles) and a heart out of a linen pattern pink paper (because I still haven't bought a heart punch, it forced me to use my electronic die cutting machine which is good since I paid good money for that thing, lol).


Attach the die cut rectangle to the upper right corner of the base leaving about a quarter inch from the top and right side of the pink background paper. Add a strip of lace to the bottom of the card.


Using 3D dots adhere to the back of doily cutout and attach to lower left corner of the card


I stapled some looped satin ribbon to the back of the heart and then attached it to the doily with 3D dots. Stamp your sentiment (mine was Happy Valentine's Day from Stampin' Up) to the rectangle in a matching ink and your card is done :)